Bio-Symphony
- Ava Shepherd

- Mar 3, 2022
- 4 min read
Updated: Mar 14, 2022
Designers: Aiqin Liang, Ella Wilson, Doris Alvarez, Ava Shepherd
Brief
For our first collaborative unit our goal for this brief was to design and make a bio material instrument which could be played amongst a group. For this project it was crucial that we experimented with making our own bio materials and document how they change over time
Making materials and experimenting
As a group we decided that the best way to get started with this brief was just to get making and experimenting with the different bio material ingredients provided for us. None of us at this stage had any clear idea of what instrument we wanted to make so thought experimentation with these materials was our best way forward.
Therefore on Tuesday we met at Dora's house with the ingredients and started making various materials.


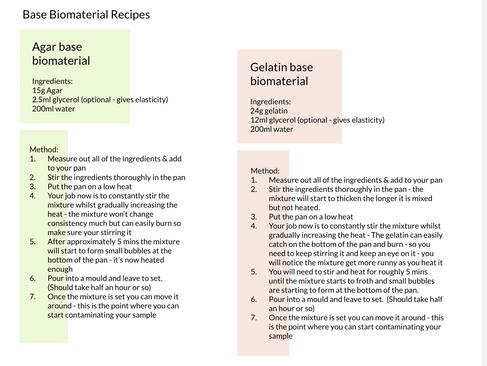
The recipes we used as a starting point
We started with the Agar base biomaterial recipe. We measured everything into the pan and documented how it looked at various stages of the 'cooking' process. When we added the water to the dry ingredients, the agar turned into this mushy substance and was quickly thickening (Stage 1). However once on the heat, the substance continued to some how both thicken and melt at the same time (Stage 2). Finally once was a liquid we poured it into a tray to then turn back into a rubbery and soft substance (Stage 3).


Stage 1 Stage 2 Stage 3
Time-lapse of us making the materials
Letting the materials change form
After this we got experimenting! We decided that it would be interesting to see how the Agar continues to change form when we add different materials and change its environment. In order to do this we added various kinds of food to leave next to a heater overnight. Our 4 main choices were mouldy green peppers, carrot, fresh mushrooms and oat milk.


The next day we went back to check on our pieces of Agar and see if their form had changed since we added new kinds of bacteria. We were happy to see that there was some definite mould growth on several of our test samples. The two most successful were the samples with the mouldy green pepper, and the oat milk.


Yoghurt & Gelatine Oat Milk, Green Pepper, Plain, Mouldy pepper Carrot, Mushroom, Yoghurt
Recording sounds and next steps
It was at this stage that we hit a bit of a plateau with our progress as we learnt that we can easily manipulate the texture of gelatine and agar, yet did not know how to turn this into an instrument. When this happened we wanted to act fast and just keep experimenting. We decided to test out the contact mics that we had and see if we could record any sounds from both our materials we made, and bio materials we find outside.


Trying to record sounds from bio materials
Unfortunately, while recording we realised that the only sound that the contact mic would pick up is movement and static. It was not the right kind of microphone for the kind of audio we were looking for. However it did make us wonder about how we could manipulate the movement that the microphone picks up to make different sounds
Manipulating the movement to make music
After discovering that we were not able to detect any organic sounds from bio materials, we were curious as to how we could manipulate the movement of these materials to create different sounds through the contact microphone. We began experimenting with changing the form of the materials, the environment they are stored in and how they are 'played' to create different sounds.
After doing this we found that we were able to create several different sounds with the contact mic when pressing materials of various sizes, volume and texture.
"Most objects do not make sound, instead a visual image is translated by technology into sound. The hope is that people can learn to interpret these soundscapes as well and as naturally as visual scenes." (Hermann, 2011, p.445)


Plastic base Tapping jars Squishy vs solid
After experimenting with various textures we were ready to start building our final instrument. We drew inspiration from instruments such as a glockenspiel where the musician taps the different shaped keys to create music. This lead us to create our own Bio Symphony box. Each material on the box had its own unique sound. However, depending on how much pressure the users uses, the way they tap it and even the length of time they press on the material will change the overall sound of the instrument.


Designing the gloves
To ensure the playing process was as easy as possible for the user, we additionally made gloves that had the microphone attached. This allows users to have a layer of protection when touching the bio materials, as well as avoiding accidentally making white noise when picking up and moving the microphone. These gloves replicated how the sticks work with a glockenspiel.


Final Performance
On Friday we had our final performance where we showcased our instrument. While our instrument may not sound very traditional, we were overall very happy with what we created in less than a week.

Audio of our final performance
Reflection
This brief personally taught me a lot about working with new materials and how to be creative with using materials in completely new ways. At the beginning of the week I had no understanding of how we would be able to use bio materials to make music. However after a week of experimenting and trying new things we ended up with something very unique and interesting. This week has highlighted to me the importance of experimenting and designing through making.
References:
Hermann, T., Hunt, A. and Neuhoff, J.G., 2011. The sonification handbook. Berlin: Logos Verlag

Comments